

Yes, a fire pit can go on a deck, and most decks handle one fine. The part that actually ruins decks is not the flame. It is the heat that sits underneath the bowl for three hours after the fire looks harmless. That is a different problem from flying sparks, it needs a different product to solve, and almost every answer to this question treats the two as one thing. So here is the version that separates them, including what to do if your deck is composite, if you rent, or if your HOA has already said no.
The Two Ways a Deck Gets Damaged
Damage arrives by two separate routes, and knowing which one you are dealing with decides everything you buy.
Route one is embers. A wood fire throws sparks. They land, they sit on a dry board, and most of the time they wink out. Occasionally one lands in the gap between two boards, where there is trapped debris and no way to see it, and that is where deck fires actually start. This is a coverage problem. You need a wide, spark proof surface catching everything that leaves the pit.
Route two is heat under the bowl. A steel fire pit bowl radiates and conducts downward for the entire burn, and the surface directly under it can sit in the 200 to 400 degree Fahrenheit range for hours. Wood does not need to reach its ignition point to be wrecked. It scorches, dries out, checks, and leaves a permanent dark ring. This is not a coverage problem. It is a thermal problem, and the fix is an air gap, not a bigger mat.
Here is why that distinction matters more than anything else on this page. The popular ember mats, the big silicone coated fiberglass sheets, are excellent at route one and do very little about route two. They lie flat on the boards. Heat pushes straight through them into the deck with nowhere to go. Several manufacturers say so plainly in their own product notes, recommending several inches of air space between the heat source and the mat. Buy the mat, skip the air gap, and you have solved half the problem while feeling like you solved all of it.
What to Actually Put Under the Fire Pit

For the heat problem, the product category you want is a rack based heat shield rather than a flat pad. The DeckProtect Fire Pit Mat and Rack is the clearest example of the design. Woven volcanic rock fiber tiles sit inside an aluminum frame, and the frame stands on short rubber feet so there is a gap between the assembly and your deck boards. That gap is the whole point. Air moves under the frame and carries heat away instead of driving it down into the wood, and the same clearance stops the mildew ring that shows up whenever anything sits flat on decking for a season. The tiles are sold in squares that combine, so a 12 by 12 inch unit is the starting block and you buy enough of them to cover the footprint of your pit plus a margin.
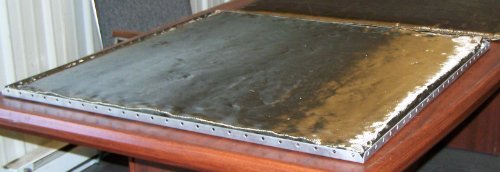
For the ember problem, coverage beats thickness. The Fireside Outdoor Ember Mat runs 67 by 60 inches, which is far wider than the pit itself, and that extra width is what catches the spark that pops sideways in a gust. It is silicone coated fiberglass with stainless grommets at the corners so it can be staked or weighted down, because an unsecured mat in wind becomes its own problem. Worth being clear about what it is. This is spark and grease protection, not a heat shield, and the honest setup for a wood burning pit on a wood deck is the ember mat spread wide with the rack based shield sitting on top of it under the pit.

If you are burning wood, add a spark screen on top of the pit. It is the cheapest item in this whole discussion and it removes most of route one before the embers ever get airborne. A heavy steel mesh screen with a lift handle, sized to your bowl diameter, is all you need. Sunnydaze makes a 24 inch version that fits the common small to mid size bowls.

Your Deck Material Changes the Answer
Pressure treated wood. The most forgiving of the group, oddly enough. It scorches, it stains, and it needs the full ember mat plus air gap setup, but it fails visibly and slowly rather than all at once. Sweep the gaps between boards before every fire. That trapped debris is the actual fuel.
Composite and PVC. This is the one people get wrong, because composite feels like the safe modern choice. Composite boards are wood flour bound in polyethylene, and polyethylene starts to soften and deform at temperatures nowhere near what it takes to ignite lumber. The board does not have to burn to be ruined. It just has to get soft under a hot bowl and take a permanent dent or a slumped hollow that no amount of cleaning fixes. Composite also runs hot in direct sun before you light anything. If your deck is composite, treat the elevated heat shield as mandatory rather than optional, and check your board manufacturer’s warranty language before you assume heat damage is covered.
Vinyl. Softens and warps faster than composite and holds up to embers poorly. Gas only, elevated shield, and honestly this is the material where moving the pit off the deck entirely is the better call.
Concrete patio or stone. Non combustible and effectively immune to the ember problem. It can still discolor and, in the case of some pavers, spall if moisture trapped inside expands under repeated heat. A mat here is cosmetic insurance, not safety equipment.
Gas Solves Most of This, With One Catch
If you have not bought yet, propane is the straightforward answer for a deck. No sparks, no ash, no ember chasing, and it goes out instantly when the evening ends, which matters more than it sounds when you are the one deciding whether the fire is cold enough to go inside. Our roundup of portable propane fire pits covers the models that make sense for a deck footprint, including the smaller tabletop units that suit a balcony.
The catch is that gas removes route one and does almost nothing about route two. A gas bowl still radiates downward the entire time it is running. So the heat shield stays in the setup even though the ember mat becomes optional. People skip it constantly because gas gets described as the safe choice, then find the ring on their decking at the end of the season.
Two more gas specifics. Keep the tank in the intended cabinet or the position the manufacturer designed for it, not tucked against the burner to hide it. And if your pit came with a lava rock or glass bead fill level marked in the manual, respect it, because that media is part of how the unit distributes heat away from the base.
If you have your heart set on wood, the practical compromise is a double wall smokeless design on its manufacturer stand. Those pits burn hotter and more completely, which means fewer live embers escaping, and the stand builds the air gap into the product instead of leaving you to engineer it. We break down which ones actually cut smoke in our guide to smokeless fire pits. The stand is not an upsell you can skip on a deck. It is the part that makes the pit deck compatible at all.
Clearances That Actually Get Enforced

Numbers vary by jurisdiction and by product, and the manufacturer manual is the one that governs your specific pit. As a working baseline, plan on roughly 10 feet of horizontal separation from the house wall and any combustible structure, at least 3 feet of clear space on every side for people and furniture, and nothing overhead. That last one catches deck owners more than anyone, because a fire pit under a pergola, a retractable awning, a soffit, or a low tree limb is a genuinely bad setup no matter how good the mat underneath is. Vertical clearance requirements in the range of 15 to 20 feet are common, and most covered decks simply cannot meet them.
The railing is the forgotten one. Radiant heat does not care that the top rail is 30 inches away and vertical. A wood or vinyl rail cap sitting a couple of feet from a running pit will discolor over a season. Check your local fire pit rules before buying, since a handful of cities go further than the general baseline, and read our notes on where to position a fire pit if you are still choosing the spot.
Weight Is Rarely the Problem, Except When It Is
Residential decks are designed to a 40 pounds per square foot live load minimum under standard code, which is a lot of margin. A 60 pound portable propane bowl is a non issue. A 250 pound gas fire table spread across four feet is usually fine too, because the load per square foot is still modest.
Where it stops being fine is a stone clad or concrete surround fire table, a masonry style build, or any pit you plan to set on a bed of pavers to solve the heat problem. Pavers weigh a great deal and they concentrate that weight over a small footprint, which is exactly the loading a deck frame handles worst. That DIY paver base you have seen recommended is a reasonable idea on a slab and a poor one on an elevated deck. If your deck is more than about fifteen years old, or you cannot see the framing from below, get eyes on the joists and posts before adding anything heavy.
Renters, HOAs, and Balconies
Four separate rulebooks can stop you, and any one of them is enough. Municipal fire code, HOA covenants, your lease, and your renter or homeowner insurance policy. They stack, so clearing one tells you nothing about the others.
Multi family buildings are the strictest case. A common rule across many jurisdictions is that open flame appliances are not permitted on combustible balconies or decks of multi family dwellings unless the area is non combustible or the building is sprinklered, and some dense urban codes ban them on balconies and rooftops outright regardless. If you are in an apartment or a condo, assume no until your building management confirms otherwise in writing.
The workarounds that usually survive that review are the ones with no wood, no ash, and no large propane cylinder. A small bioethanol tabletop burner, an electric flame effect unit, or an electric infrared patio heater for actual warmth. A heater is the better trade in most cases anyway, because on a balcony you wanted to be warm, and the fire was just how you assumed you would get there.
For homeowners with an HOA, submit the request rather than asking informally. Boards approve fire pits far more often when the request includes the specific model, a gas fuel type, the barrier product going underneath, and the clearance distances, because that turns an open ended liability question into a documented plan.
Before and After Every Fire
- Sweep the gaps between deck boards. Trapped leaves and needles are the fuel that turns a stray ember into a real problem.
- Check the wind before lighting, not after. A pit that is fine in still air throws sparks a surprising distance in a 10 mile per hour gust.
- Burn seasoned hardwood only. Oak, hickory, and black locust pop far less than pine or spruce, and green or resinous wood is the single biggest cause of flying embers.
- Keep a connected hose or a pressurized water extinguisher within reach. A bucket of water dumped on a hot steel bowl can crack it and does not solve much.
- Put a hand near the deck under the pit once the fire is out. If the boards are warm to the touch, your barrier is not doing the job and you need the air gap.
- Move ashes only when they are completely cold, into a metal container with a lid, and never into a plastic bin on the deck.
The Setup We Would Choose
If your deck is wood or composite and you want this settled in one purchase, buy a propane fire pit and put it on an elevated rack style heat shield like the DeckProtect frame. That combination removes the ember risk entirely, handles the heat that actually damages boards, and costs less than one deck repair. If you insist on burning real wood, the only version we would run on a deck is a double wall smokeless pit on its factory stand, sitting on a rack shield, on top of an oversized ember mat, with a spark screen on the bowl. Anything short of that on a wood deck is trading a scorched ring or worse for the money you saved on a mat.
Last update on 2026-10-07 / Affiliate links / Images from Amazon Product Advertising API
This post contains affiliate links, which means I may receive a small commission, at no extra cost to you, if you make a purchase using these links.


